











How to Find Short Circuit in Mobile Motherboard: Step-by-Step Guide
A mobile phone that does not turn on can have many different problems. The battery may be faulty, the charging section may be damaged, or the motherboard may have a short circuit.
A short circuit on a mobile motherboard is one of the common problems faced by mobile repair technicians. It can cause the phone to remain completely dead, restart repeatedly, heat up quickly, or consume abnormal current.
The good news is that a short circuit can often be located with the right tools and a systematic testing method.
In this guide, we will explain how to find short circuit in mobile motherboard step by step. You will learn how to check the motherboard with a multimeter, identify abnormal readings, use a DC power supply, and narrow down the faulty section.
Important: Motherboard troubleshooting requires care. Always disconnect the battery before performing resistance or continuity tests, and avoid applying unnecessary voltage to the board. If you are a beginner, practice on a damaged or training motherboard before working on a customer’s phone.
What Is a Short Circuit in a Mobile Motherboard?
A short circuit happens when electrical current finds an unintended low-resistance path between two points in a circuit.
Mobile motherboards contain many tiny components, including:
- Capacitors
- Resistors
- Coils
- Diodes
- ICs
- MOSFETs
- Power management components
- Charging components
- CPU and memory-related circuits
If one of these components fails, it can sometimes create a short between a power line and ground.
For example, a damaged capacitor connected to a main power rail can cause the entire power line to become shorted to ground.
This may prevent the phone from powering on.
Common Symptoms of a Short Circuit
Before opening the motherboard, look for signs that indicate a possible short circuit.
1. Phone Is Completely Dead
The phone does not respond when you press the power button.
However, a dead phone does not always mean a short circuit. The battery, charging circuit, power button, PMIC, or other components can also cause a dead condition.
2. Phone Gets Hot Quickly
If a component becomes unusually hot shortly after connecting the battery or power supply, it may indicate excessive current consumption.
The hot component can sometimes help you locate the faulty area.
3. Abnormal Current Consumption
When a motherboard is connected to a DC power supply, unusually high current consumption without a proper power-on sequence can indicate a short or another power-related fault.
4. Battery Drains Very Quickly
A short or leakage on a power rail can cause abnormal battery drain.
5. Phone Turns Off or Restarts
Some faults do not create a complete short. A partially shorted or leaking component can cause unstable power and repeated restarting.
Tools Required to Find a Mobile Motherboard Short
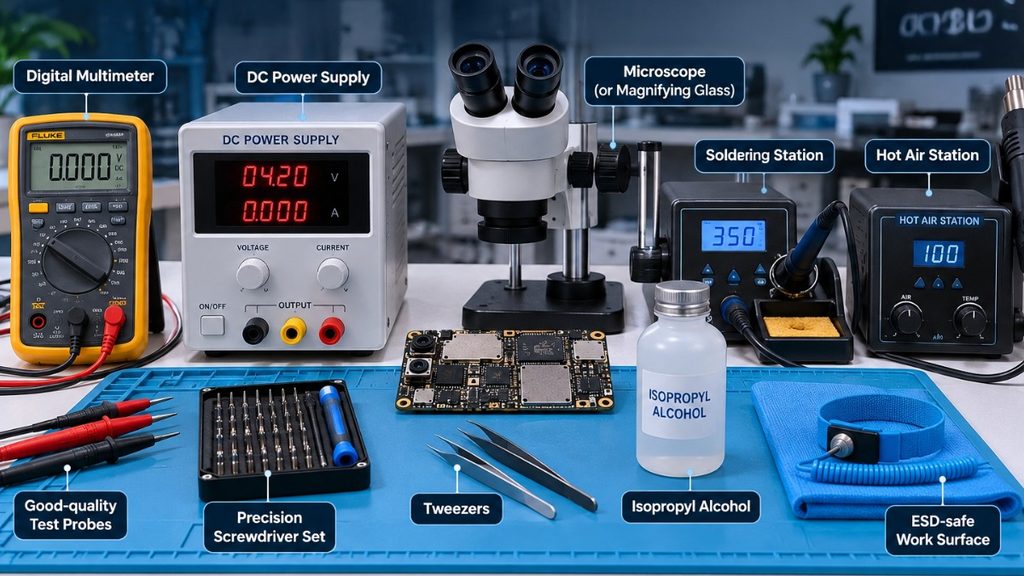
You do not need a large collection of equipment for basic short-circuit diagnosis.
Essential Tools
- Digital multimeter
- DC power supply
- Good-quality test probes
- Precision screwdriver set
- Microscope or magnifying glass
- Tweezers
- Soldering station
- Hot air station
- Isopropyl alcohol
- ESD-safe work surface
A multimeter is one of the most important tools because it allows you to check resistance, continuity, diode readings, and voltage.
A DC power supply becomes especially useful when you need to observe current consumption.
How to Find Short Circuit in Mobile Motherboard Step by Step
Now let’s look at the practical troubleshooting process.
Step 1: Remove the Motherboard
First, carefully disassemble the phone and remove the motherboard.
Before doing anything else:
- Disconnect the battery.
- Remove the charging cable.
- Remove SIM and memory cards if required.
- Keep screws and small components organized.
- Inspect the board under good lighting.
Avoid testing the motherboard while it is still connected to unnecessary components.
Step 2: Perform a Visual Inspection
Never start with random testing.
First, inspect the motherboard carefully.
Look for:
- Burn marks
- Corrosion
- Water damage
- Broken components
- Missing components
- Cracked ICs
- Damaged connectors
- Discolored areas
- Solder bridges
- Signs of previous repair work
Water-damaged phones deserve special attention because corrosion can create leakage and short-circuit conditions.
Why Visual Inspection Matters
Sometimes the faulty area is visible.
For example, a damaged capacitor or burnt component may immediately identify the problem area and save a lot of testing time.
Step 3: Set the Multimeter Correctly
A digital multimeter can be used in different modes depending on the test.
For motherboard short-circuit testing, technicians commonly use:
- Resistance mode
- Diode mode
- Continuity mode
- DC voltage mode
For resistance testing, the goal is to determine whether a power rail has an unusually low resistance to ground.
For diode-mode testing, the readings can help compare circuit behavior and identify abnormal conditions.
Basic Digital Multimeter Numbers for Beginners
If you are new to mobile motherboard repair, multimeter readings can be confusing. The most important thing to understand is that one number alone does not always confirm a short circuit.
The motherboard design, power rail, ICs, capacitors, and phone model all affect the reading.
Still, these basic ranges can help beginners understand what they are seeing.
Resistance Mode: Basic Guide
With the battery disconnected, set your digital multimeter to resistance mode (Ω).
Place the black probe on Ground (GND) and the red probe on the power line or test point you want to check.
| Multimeter Reading | Beginner’s Interpretation |
|---|---|
| 0–1 Ω | Very low resistance; possible hard short |
| 1–5 Ω | Very low; investigate the power rail |
| 5–20 Ω | Low resistance; may be normal or may indicate a fault depending on the circuit |
| 20–100 Ω | Usually worth checking further |
| 100 Ω–1 kΩ | Often indicates the line is not directly shorted |
| 1 kΩ or higher | Generally not a hard short to ground |
| OL / ∞ | Open circuit or very high resistance |
Important
These numbers are general beginner guidelines, not universal rules.
For example, some CPU or processor-related power rails can naturally show very low resistance because they supply high-current circuits. Therefore, a reading of 1–5 Ω does not automatically mean that the motherboard is defective.
The best method is to compare the reading with:
- A known-good motherboard of the same model
- A circuit diagram or boardview
- Manufacturer/service documentation
- Other test points on the same board
Continuity Mode: What Does the Beep Mean?
When you put the multimeter in continuity mode, the meter may beep when resistance is very low.
For a beginner:
Beep = very low resistance detected.
But:
Beep ≠ automatically a short circuit.
Some motherboard circuits naturally have low resistance to ground.
Therefore, if the meter beeps, switch to resistance mode and check the actual resistance value.
Simple Example
If the multimeter beeps and shows:
0.3 Ω
This is a strong indication that you should investigate that line for a possible short.
If it beeps and shows:
8 Ω
Do not immediately remove a component. The circuit may naturally have low resistance.
Diode Mode: Basic Beginner Understanding
Diode mode is also commonly used for mobile motherboard diagnosis.
A diode-mode reading is usually displayed as a value such as:
- 0.150
- 0.300
- 0.450
- 0.600
- 0.700
- OL
The correct value depends heavily on the particular circuit and the direction of the probes.
Therefore, beginners should not use a fixed diode number as a universal short-circuit rule.
Instead, use diode mode mainly for comparison.
For example:
Known-good board: 0.450
Faulty board: 0.020
A large difference can indicate that the line needs further investigation.
The Easiest Rule for Beginners
If you are just starting mobile motherboard repair, remember this simple process:
1. Disconnect the battery.
↓
2. Put the multimeter in Ω (resistance) mode.
↓
3. Black probe → GND
↓
4. Red probe → suspected power line
↓
5. Check the reading.
↓
6. Very low resistance such as 0–1 Ω → investigate for a possible hard short.
↓
7. If the reading is higher → do not automatically assume the board is good. Continue testing the relevant circuit.
Never Use This Number as a Universal Rule
You may hear technicians say:
“Below 10 Ω means short.”
This is not a reliable universal rule for every mobile motherboard.
Some power rails can normally have low resistance because of the components connected to them.
The correct approach is:
Reading + Circuit Knowledge + Comparison = Better Diagnosis
This is much safer than simply looking at one number.
Beginner Multimeter Cheat Sheet
For quick reference:
- 0–1 Ω: Strong reason to investigate for a hard short
- 1–5 Ω: Very low; investigate carefully
- 5–20 Ω: Could be normal depending on the circuit
- 20–100 Ω: Further testing may be required
- 100 Ω+: Usually not a direct hard short
- OL: Open/high resistance
- Continuity beep: Low resistance detected, but not automatically a short
- Diode mode: Best used with circuit knowledge and comparison
Safety Reminder
Always disconnect the battery before checking resistance or continuity on a mobile motherboard.
Never inject random voltage into a suspected shorted line. Incorrect voltage or excessive current can damage the motherboard and make the original problem worse.
Tip: Do not assume that every low resistance reading means a short. Some mobile motherboard power rails naturally have low resistance, especially around high-current circuits. Always compare the reading with the circuit design, known-good board, or service documentation when available.
Step 4: Check the Main Power Line
With the battery disconnected, identify the relevant power line and ground.
Place one multimeter probe on the ground point.
Then touch the other probe to the suspected power line or test point.
You can check the reading in resistance or diode mode, depending on the diagnostic method you are using.
What Are You Looking For?
You are looking for an abnormal reading that is significantly different from what the circuit normally shows.
Do not judge the result from one number alone.
Different phones have different motherboard designs, so there is no universal resistance value that applies to every mobile phone.
Step 5: Use Diode Mode for Further Testing
Diode mode is commonly used by mobile technicians to check motherboard lines.
The exact reading depends on:
- Phone model
- Circuit design
- Test-point location
- Probe polarity
- Connected components
- Board condition
If you have a known-good motherboard of the same model, comparing the readings can be extremely helpful.
Why Comparison Helps
Suppose the same test point on a working board gives a stable reading while the faulty board gives a dramatically different reading.
That difference can help you identify the affected circuit.
This is often more reliable than guessing based on a generic “short circuit value.”
Step 6: Divide the Circuit Into Sections
If you confirm that a power line appears shorted, do not immediately start removing random components.
Instead, identify the affected circuit.
Mobile motherboards contain different sections, such as:
- Charging section
- Battery section
- Power management section
- Display power section
- Camera power section
- Audio section
- RF/network section
- USB/charging section
- Processor-related power rails
Breaking the problem into sections makes troubleshooting much easier.
Step 7: Check Capacitors Around the Shorted Line
Capacitors are common components found around power rails.
A damaged capacitor can sometimes short the power line directly to ground.
Inspect the capacitors connected to the affected rail.
Look for:
- Physically damaged capacitors
- Corrosion
- Burn marks
- Unusual readings
- Components connected directly to the suspected rail
However, remember that a capacitor showing continuity does not automatically mean it is faulty. Circuit paths can produce continuity or low resistance readings even when all components are working normally.
Step 8: Use a DC Power Supply
A DC power supply can provide valuable information when diagnosing a short.
Connect the motherboard correctly according to the phone’s power input requirements.
Then observe the current behavior.
Possible Situations
If the board immediately consumes abnormal current before a normal power-on sequence, there may be a short or leakage on a power rail.
If the current remains near zero, the problem may be elsewhere.
If the current changes after pressing the power button, the motherboard may be entering part of its normal boot sequence.
The current pattern should always be interpreted according to the specific phone model and circuit design.
Step 9: Locate the Heating Component
In some cases, a shorted component can be identified by finding the area that heats up when the affected circuit is safely powered.
Technicians may use:
- Thermal camera
- Thermal imaging attachment
- Isopropyl alcohol
- Controlled power injection
- Microscope
Using Isopropyl Alcohol
A small amount of isopropyl alcohol can sometimes be placed over the suspected area.
When the board is powered under controlled conditions, the faulty area may evaporate the alcohol faster because of localized heating.
This method requires experience and careful voltage/current control.
Thermal Camera Method
A thermal camera can make the process easier.
The camera can help identify a component that becomes warmer than the surrounding components.
Once the hot component is located, the technician can inspect and test it more closely.
Step 10: Isolate the Faulty Component
Once you identify the suspected area, test the components around it individually where possible.
Depending on the circuit, the faulty component could be:
- Capacitor
- Diode
- MOSFET
- IC
- Charging component
- Power-management component
Do not remove components without understanding their circuit function.
A motherboard contains many components that may appear similar but perform completely different jobs.
Step 11: Remove the Suspected Shorted Component
If testing confirms that a component is faulty, a trained technician can remove it using suitable soldering or hot-air equipment.
After removing the component:
- Allow the board to cool.
- Clean the area.
- Inspect the pads under magnification.
- Check the power line again.
- Compare the reading with the previous result.
- Confirm that the short has actually disappeared.
- Continue with functional testing.
If the short remains, the removed component may not have been the root cause.
There could be another component or IC connected to the same power rail.
Step 12: Test the Motherboard Again
After repairing the suspected fault, do not immediately assemble the entire phone.
Perform basic tests first.
Check:
- Main power line
- Battery connection
- Charging section
- Power button response
- Current consumption
- Display connection
- USB charging behavior
If the board starts normally, continue with complete testing.
Common Causes of Mobile Motherboard Short Circuit
A short circuit can happen for many reasons.
1. Water or Liquid Damage
Liquid can cause corrosion and electrical leakage.
This is particularly common when the phone has been exposed to:
- Water
- Rain
- Sweat
- Humidity
- Other liquids
2. Damaged Capacitor
A failed capacitor can short a power rail to ground.
3. Incorrect Repair
Poor soldering or incorrect component installation can create an unintended connection between two points.
4. Physical Damage
A phone that has been dropped or bent can suffer motherboard damage.
5. Charging Problems
Faulty chargers, damaged cables, charging-port problems, or failures in the charging circuit can contribute to motherboard faults.
6. Overheating
Excessive heat can damage electronic components and eventually cause circuit failure.
Important Mistakes to Avoid
Finding a short circuit is not just about using a multimeter. The testing method matters.
Do Not Assume Every Continuity Beep Means a Short
A continuity beep only tells you that the resistance is below the meter’s continuity threshold.
It does not automatically prove that a component is damaged.
Do Not Inject Random Voltage
Never apply arbitrary voltage to a motherboard just to find a short.
Incorrect voltage or excessive current can cause additional damage.
Do Not Remove Components Randomly
Removing several capacitors without understanding the circuit can create new problems and make diagnosis more difficult.
Do Not Ignore the Battery
A faulty or damaged battery can create symptoms that look similar to motherboard problems.
Always test with a known-good battery when appropriate.
Do Not Skip Visual Inspection
Corrosion, burnt components, and physical damage can provide important clues before electrical testing begins.
Resistance Mode vs Diode Mode
Both methods can be useful, but they provide different information.
| Testing Method | Main Purpose |
|---|---|
| Resistance Mode | Checks resistance between a line and ground |
| Diode Mode | Helps evaluate semiconductor and power-line behavior |
| Continuity Mode | Quickly checks for very low resistance paths |
| DC Voltage Mode | Checks whether required voltages are present |
| DC Power Supply | Helps observe current consumption and power behavior |
A professional technician should understand what each reading means instead of relying on one testing mode.
How to Find a Short Without Removing Every Component
This is one of the most common questions among beginners.
You generally do not need to remove every capacitor or component.
A better approach is:
- Identify the affected power rail.
- Confirm the abnormal reading.
- Study the circuit around that rail.
- Check components connected to it.
- Look for localized heating.
- Compare readings with a known-good board when possible.
- Isolate the suspected component.
- Recheck the line after repair.
This systematic approach is safer and saves time.
Tips for Beginners Learning Mobile Motherboard Repair
If you are new to mobile repairing, do not start by working on an expensive customer’s phone.
Instead:
- Practice on old motherboards.
- Learn how to use a multimeter properly.
- Understand resistance and diode readings.
- Learn basic electronics.
- Practice soldering on scrap boards.
- Use a microscope for small components.
- Keep a record of your measurements.
- Compare good and faulty boards.
- Learn basic circuit diagrams.
- Always work carefully and patiently.
The most important skill in motherboard repair is not simply replacing components. It is finding the actual cause of the problem.
Key Takeaways
Here are the most important points to remember:
- A dead phone does not automatically mean a short circuit.
- Start with a visual inspection.
- Disconnect the battery before resistance testing.
- Use a multimeter to check suspected power rails.
- Diode-mode readings can help with circuit comparison.
- A low resistance reading is not always a short.
- DC power supply current behavior can provide useful clues.
- Thermal methods can help locate a heating component.
- Capacitors are among the components worth checking around a shorted power rail.
- Never inject random voltage into a motherboard.
- Always verify the repair after removing or replacing a suspected component.
- Use a known-good board or service information whenever possible.
Conclusion
Learning how to find short circuit in mobile motherboard is an important skill for anyone interested in professional mobile repairing.
The key is to avoid guessing.
Start with a visual inspection, disconnect the battery, use your multimeter carefully, identify the affected power rail, and then narrow the problem down step by step. A DC power supply, thermal inspection, and comparison with a working motherboard can make the diagnosis much easier.
Remember that every mobile motherboard is different. A reading that is normal on one phone may not be normal on another. That is why proper circuit knowledge and practical experience are so important.
With regular practice, patience, and the right tools, you can become much better at diagnosing motherboard faults instead of simply replacing parts and hoping the phone works.
Want to learn professional mobile motherboard repairing, short-circuit diagnosis, IC testing, soldering, and advanced troubleshooting?
Virani Telecom provides practical mobile repairing training designed to help learners understand real-world mobile repair techniques.
Dahisar – HO
Shop No 2D Bldg No.2, Labh Darshan, D Wing, Chhatrapati Shivaji Rd, near Subway, Avdhut Nagar, Dahisar East, Mumbai, Maharashtra 400068
Borivali
Shop No.5, Thakkar Shopping Centre, Gyan Nagar, Mhatre Wadi, Borivali West, Mumbai, Maharashtra 400092
Kandivali
Shop No 103, Ground Floor, Raghuleela Mega Mall, Bus Depot, near Poisar, Kandivali, Jai Bhim Sanjay Nagar, Kandivali West, Mumbai, Maharashtra 400067
Whether you are a beginner or want to improve your motherboard troubleshooting skills, practical training can help you build confidence and develop the skills needed for professional mobile repair work.
Start learning mobile repairing with Virani Telecom and take your repair skills to the next level.
Frequently Asked Questions
1. How can I tell if my mobile motherboard has a short circuit?
A phone may have a short circuit if it shows abnormal current consumption, heats up unexpectedly, remains completely dead, or has an unusually low resistance on a power rail. However, these symptoms can also have other causes, so proper testing is required.
2. Can I find a motherboard short circuit with a multimeter?
Yes. A multimeter is commonly used to check resistance, diode readings, continuity, and voltage on mobile motherboards. The readings must be interpreted according to the specific circuit and phone model.
3. Does a continuity beep mean the motherboard is shorted?
No. A continuity beep does not automatically mean that the motherboard has a short circuit. Some power rails naturally have low resistance, so you need to understand the circuit and compare the reading appropriately.
4. Can a capacitor cause a mobile motherboard short?
Yes. A failed capacitor can create a short between a power rail and ground. However, technicians should confirm the fault before removing the capacitor because other components connected to the same line can also cause similar readings.
5. Can a DC power supply help find a mobile motherboard short?
Yes. A DC power supply can help technicians observe current consumption and identify abnormal power behavior. Controlled testing can also help locate a component that becomes unusually hot.
6. Is it safe for beginners to repair motherboard short circuits?
Motherboard repair requires careful handling of small components and sensitive circuits. Beginners should first practice on old or training boards and learn proper multimeter, soldering, and power-supply techniques before working on valuable devices.

Chetan
September 19, 2026👌 Wow 👌 Excellent Awesome 👌